Quick Start
Note: This book is a work in progress and under heavy revision. Some content may be inaccurate, describe features no longer supported, or just plain wrong.
Here you will learn about how to use the next generation code editor, Light Table. We will start with the basics and work our way to more advanced features and usages.
While not comprehensive, the following should point you to areas of interest in Light Table.
As Light Table is mostly written in Clojure(Script), we will highlight functionality for it here.
Get Light Table
First we need to download Light Table. It can be obtained by the Download button on Light Table's website. The download will be in the form of an archive (e.g., .tar, .zip) that you will need to extract.
Clojure Eval
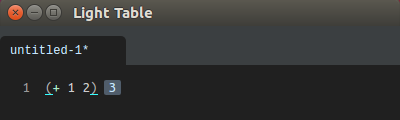
After starting Light Table, open a new file by pressing Ctrl-N. This will create a temporary file named untitled-1.
Since the new file is not yet a Clojure or ClojureScript file we will set the syntax to Clojure. To do so, press Ctrl-Space to open the command bar, type/select 'Set current editor syntax', then select Clojure from the list.
Next, type (+ 1 2) followed by pressing Ctrl-Enter (Cmd-Return on Mac). This installs dependencies, if any, and evals the expression, which should return 3 to the immediate right of the line.
Clojure Instarepl
Note: Instarepl currently only works for Clojure files (.clj), not ClojureScript.
Note: The Instarepl is anticipated to be deprecated due to a lack of a maintainer and removed entirely starting with v0.9.0.
The Instarepl is no longer packaged with Light Table by default. First we will need to install the plugin. Navigate to the command bar (Ctrl-Space) and type/select 'Plugins: Show plugin manager'. This will open up the plugin manager. Type 'clojureinstarepl' and press enter to get a list of results. Hover the mouse over the 'ClojureInstarepl' result and an option to install the plugin should appear on the right hand side. Click to install the plugin. It may be necessary to restart Light Table to ensure the new plugin is fully loaded.
With the Instarepl plugin installed, press Ctrl-Space to show the command bar, type "repl" in the command search box, and then select one item to run it:
- Open a Clojure instarepl
- Make current editor an instarepl
User settings
You can access user settings by opening the Commands menu (Ctrl-Space) and typing Settings:. The following items should appear in the menu:
- Settings: User keymaps
- Settings: User behaviors
- Settings: Default keymaps
- Settings: Default behaviors
- Settings: Workspace behaviors
Alternatively, the same settings files are accessible in the following locations:
- Mac:
~/Library/Application Support/LightTable/User/ - Linux:
~/.config/LightTable/User/ - Windows:
%APPDATALOCAL%/LightTable/User/
Plugins
Light Table's best features come from the plugins written by plugin authors. They can customize and enhance your Light Table experience to suit your needs. All published plugins can be found in Light Table's plugin manager, the plugin meta repository, or on Github.
What next
You may want to
Check out the shortcuts. For default shortcuts and keymapping press
Ctrl-Space, enter 'keymap', and choose 'Settings: Default keymap'. This file contains all shortcuts included in Light Table by default. If you wish to change or override any then do so in the user keymap.The basic shortcuts
  Ctrl-W       close tab
  Ctrl-O       open file
  Ctrl-N       new file
  Ctrl-F       find
  Ctrl-Space   show command bar
  Ctrl-D       show document for selected function
  Ctrl-Shift-D show searchable language document bar
  Cmd-digit    switch to the Nth tab (Ctrl-digit on Linux)
To change various settings type Ctrl-Space
Settings: User behaviors- Change a theme by editing the string theme name in (:lt.objs.style/set-theme "default") for example (:lt.objs.style/set-theme "ibdknox")
- Try vim mode by adding (:lt.plugins.vim/activate-vim) (Note: The Vim plugin must be installed. See this article for details.)
- Try emacs mode by adding (:lt.plugins.emacs/activate-emacs)
- Questions and updates welcome.
Below are links users both new and old will find useful.
New Users
If you are coming from Vim, see For Vim Users.
If you are coming from Emacs, see For Emacs Users.
Tutorials and Screencasts
- Getting the feel for the Light Table's instarepl by Marian Schubert
- Set of screencasts on Clojure programming in LightTable by James Trunk
- Set of screencasts on ClojureScript programming in LightTable by Zubair Quraishi
- ClojureScript Analysis & Compilation in LightTable by David Nolen BROKEN LINK -- FIX!
- Leveraging custom expressions to write Idiomatic Clojure code by Daniel Ribeiro
- A Guide to Watches by Brian Zindler
- How to programmatically manage a Light Table-aware nREPL server by Manuel Paccagnella