Creating plugins
Getting started
If you are not already familiar with the BOT Architecture in Light Table, it's highly recommended that you read through that before starting to develop a plugin for Light Table.
Bootstrap using the Leiningen lt-plugin
The easiest route to get started with creating a new plugin is to use the lt-plugin for Leiningen. If haven't installed Leiningen and don't feel like doing so, you can obviously create the files listed below manually.
To get started. Just type the following in a terminal
#> lein new lt-plugin myplugin- Then add the
folder to your Light Table workspace
| Structure | Description |
|---|---|
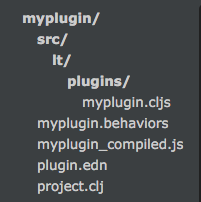 |
|
For a more in-depth explanation of what you can configure in your
.behaviorsfile check out the Behaviors File Reference
Developing
You might find inspiration from the following plugin creation guides
- Creating a Skin
- <Need an example of something in between...>
- Creating a Language plugin
Submit a plugin
If it's your first time submitting a plugin, make sure you have a valid plugin.edn. Fill out the keys as follows:
:name*: Camel case is recommended:version*: Must be in format X.X.X e.g. 0.1.4:source*: Must be a github url e.g. https:\/\/github.com\/USER\/PLUGIN:behaviors*: Refers to the behaviors file which is needed to load the plugin and define any keybinding or behavior.:desc: Primary means users can find your plugin:author: Your name and another useful way to find your plugin
* Means the field is required.
When releasing a new version, you must update the :version key and push the new git tag e.g. git tag X.X.X && git push --tags. With your updated plugin.edn, add or update your plugin to the plugin metadata repository using these instructions.